Glossary of what each field and toggle does in the Edit Raffle menu.
Table of Contents
1. Basic Tab
3. Email Tab
5. Ticker Tab
6. InVenue Tab
7. Advanced Tab
Basic Tab:
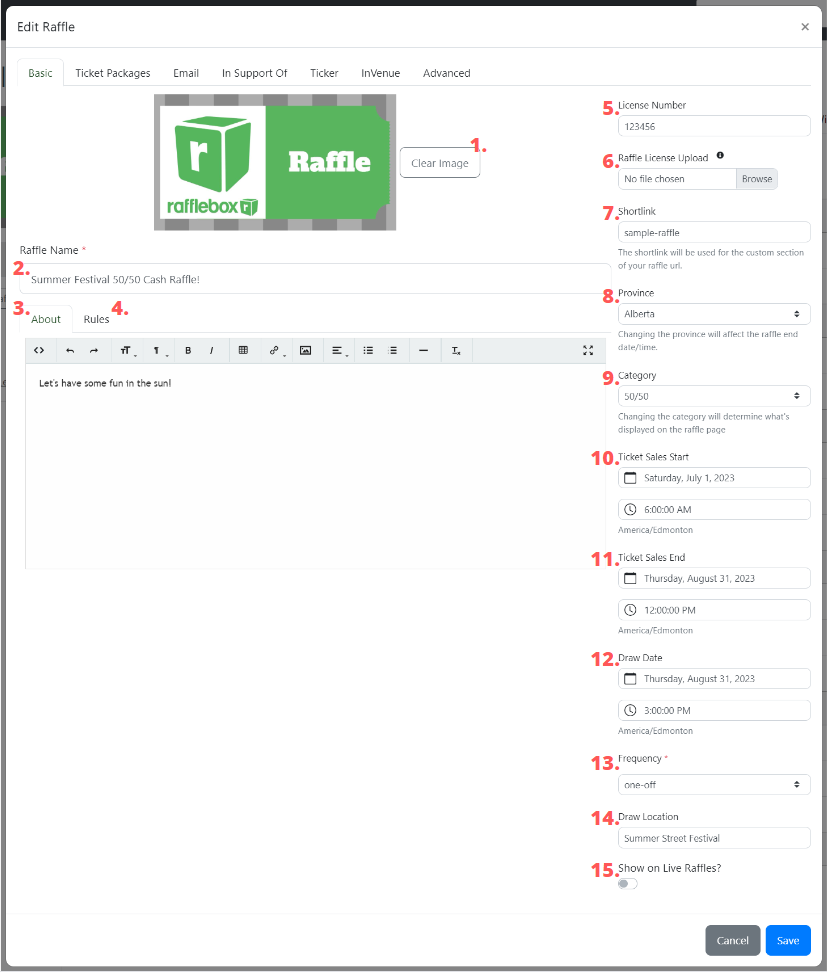
1. Image Upload / Clear image - Insert / edit your raffle banner here. Ideal dimensions are 1120px x 630px, or landscape images in a 16:9 ratio.
NOTE - image upload is limited to files less than 1.5mb in size, and must be in jpg, jpeg or png format.
2. Raffle Name - Title of your raffle event.
Note that the Rafflebox Live Raffles page searches for raffle events based on what is in this field. It is good practice to include your organizations name, event type (50/50 or Prize draw). If running a recurring draw the draw date should also be included.
3. About - This will be displayed on your draw landing page under the About Section. List a brief description about your organization and/or the purpose of your raffle and what the raised funds will be used for. Example Here
4. Rules - This is where you enter your event rules that will be displayed on the landing page for purchasers.
5. License Number - Enter the license number as it appears on your raffle license as provided by your governing body.
6. Raffle License Upload - Attach a copy of your approved raffle license. This will be reviewed by the Rafflebox team upon requesting activation.
7. Shortlink - This is the unique identifier for your draw and will appear at the end of the landing page URL you will promote for ticket sales. (https://www.rafflebox.ca/raffle/SHORTLINK)
8. Province/State - The region which your raffle is taking place in. The time zone enforced on your draw is set by this selection. This setting will default to the Province/State assigned to your Rafflebox account and will appear as the default selection for Province/State in the ticket purchase checkout.
9. Category - 50/50, or Raffle. 50/50 draws will display a total gross sales jackpot amount with a subscript message of winner get half and the calculation on the landing page. Raffles or "Prize Raffle" will display a total funds raised message.
10. Ticket Sales Start - The date/time at which your raffle sales will be open for purchase. This should align with what is listed on your raffle license. Once the draw is activated the landing page will display a countdown to the open of sales.
11. Ticket Sales End - The date/time at which your raffle sales will close. No orders will be processed after this date/time. Once the draw is activated and the Ticket Sales Start has passed the landing page will display a countdown to the close of sales.
12. Draw Date - The date/time at which you will conduct the draw. This should align with what is listed on your raffle license (if applicable) This date will be displayed on the landing page and appear in ticket confirmation emails to purchasers.
13. Frequency - How often you will be running raffles (Note - this is for billing purposes only. Raffles are not automatically regenerated).
14. Draw Location - Where the draw will take place. Although draws are typically conducted through the Rafflebox dashboard using our Random Number Generator (RNG) a physical location should still be listed. This will appear in all ticket confirmation emails to purchasers.
15. Show on Live Raffles - Having this enabled will allow your raffle to be searched on Rafflebox's Find a Raffle page.
Ticket Packages Tab:
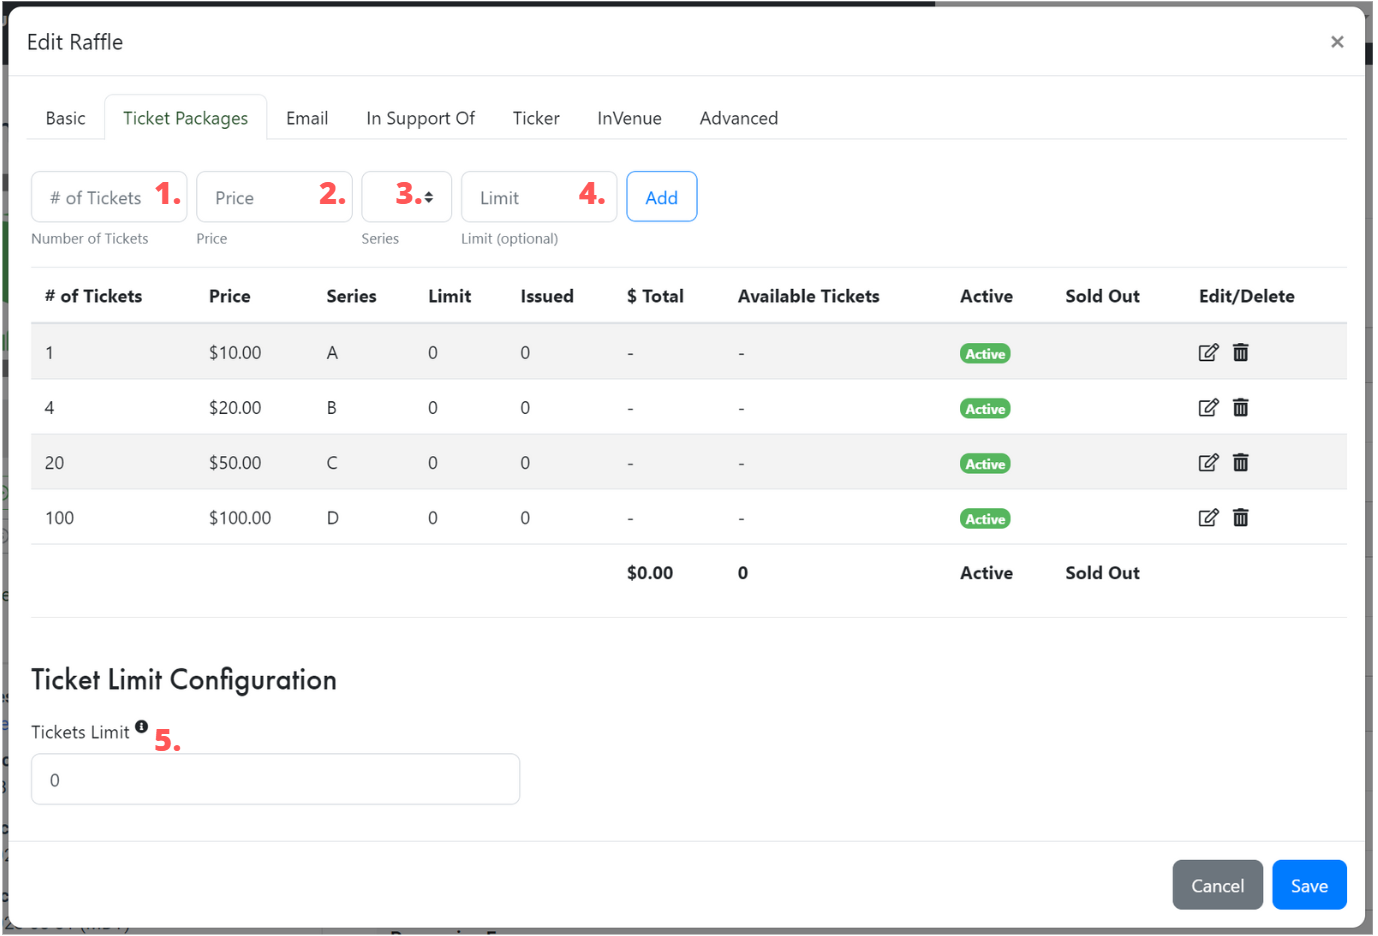
1. # of Tickets - The number of tickets that are being offered in a bundled package. Example (4 tickets for $20)
2. Price - How much the bundled package costs.
3. Series - This is the identifier for the ticket package is being sold.
4. Limit - This applies to licenses that have restrictions on how many tickets can be sold of each bundle. The limit refers to how many total packages are available at that tier. Example - 400 tickets available at 4 for $20 would have a limit of 400/4 = 100 packages.
5. Tickets Limit - This applies to licenses that have restrictions on how many total tickets can be sold. Insert the maximum number of tickets that are available here.
Email Tab:
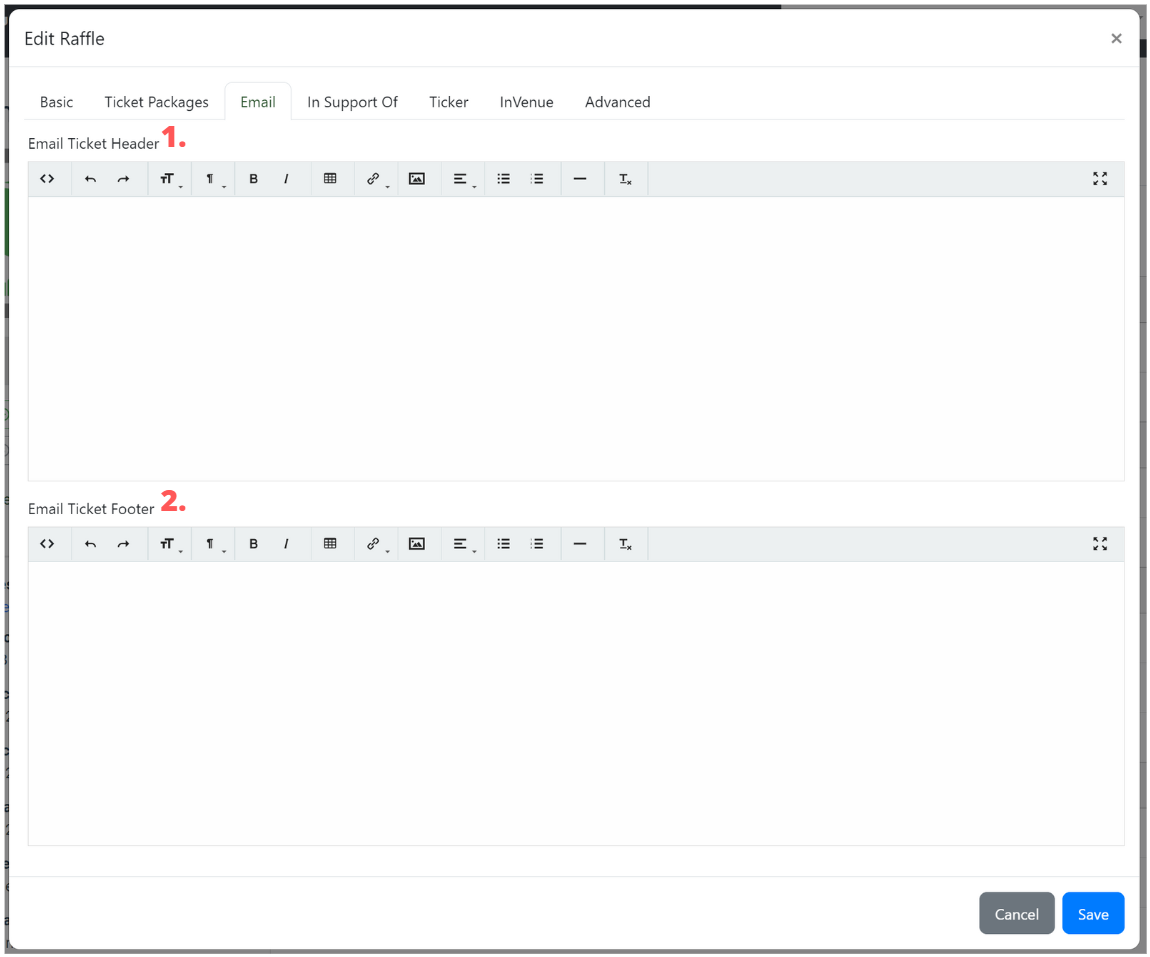
1. Email Ticket Header - Any additional info that is entered here will appear above the system auto-generated details message on the ticket confirmation email.
2. Email Ticket Footer - Any additional info that is entered here will appear below the system auto-generated details message on the ticket confirmation email.
Details on how to generate a sample ticket for review can be found here
In Support Of Tab:
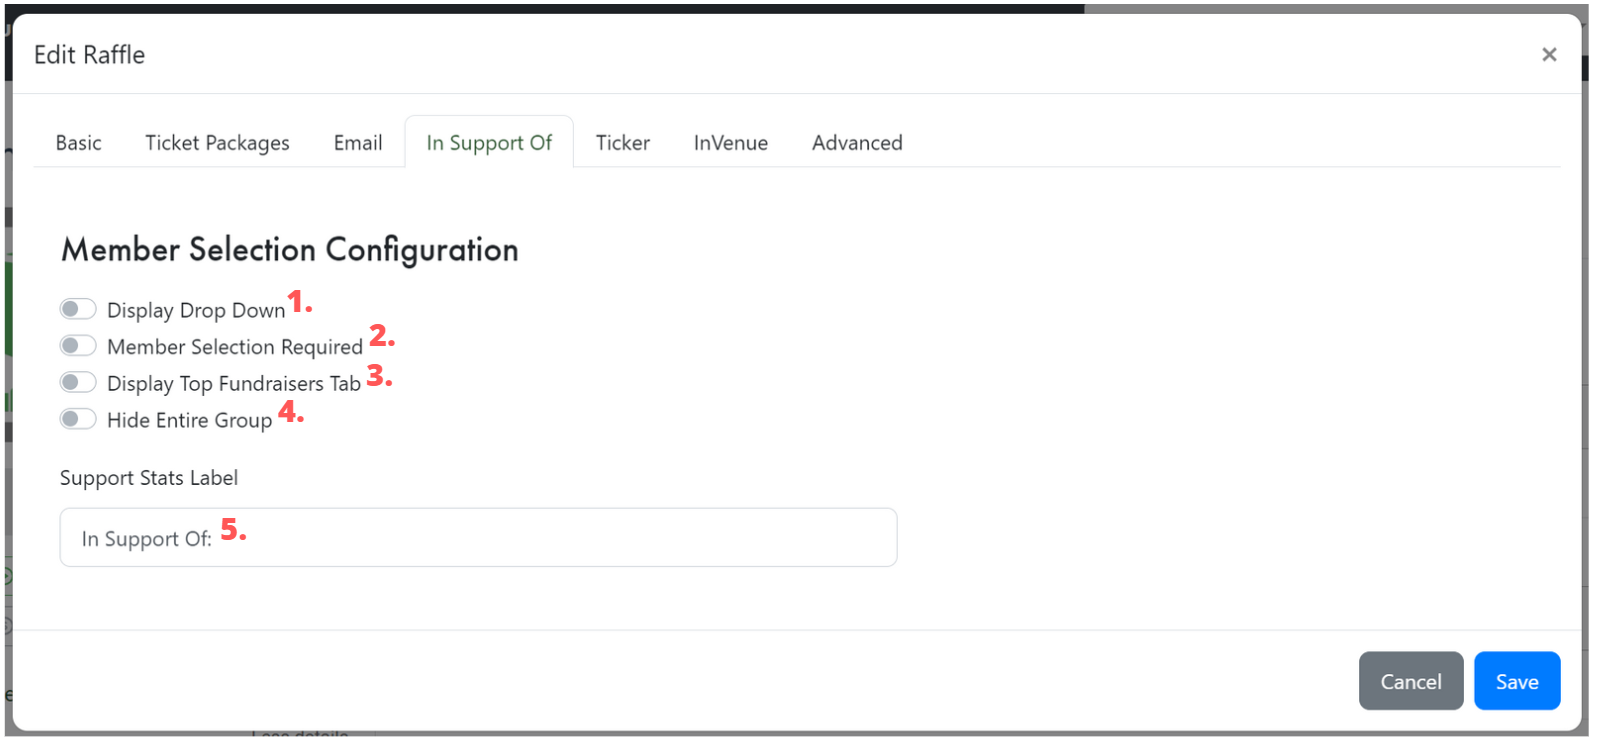
1. Display Drop Down - This will enable the In Support feature and display the member list dropdown on your raffle page. NOTE - this must be enabled for member sales tracking to work.
2. Member Selection Required - This will make a selection from the dropdown list mandatory before completing a purchase.
3. Display Top Fundraisers Tab - This will display the Top Fundraisers tab showing the sales tally for each listed member on your landing page.
4. Hide Entire Group - This will hide the “Entire Group” option in the member dropdown list. Enable this if you want to list a specific group name for tracking in the dropdown. NOTE - if a purchaser selects the default Entire group option the sales tracking is entered with a blank record implying the funds would go to the hosting organization.
5. Support Stats Label - This is what appears above the member list dropdown when the In Support feature is enabled. By default In Support Of: is the heading but this can be edited to lines like "Referred By:" "Pick Your Team/Player" "Choose a Classroom" to fit the event.
Ticker Tab:
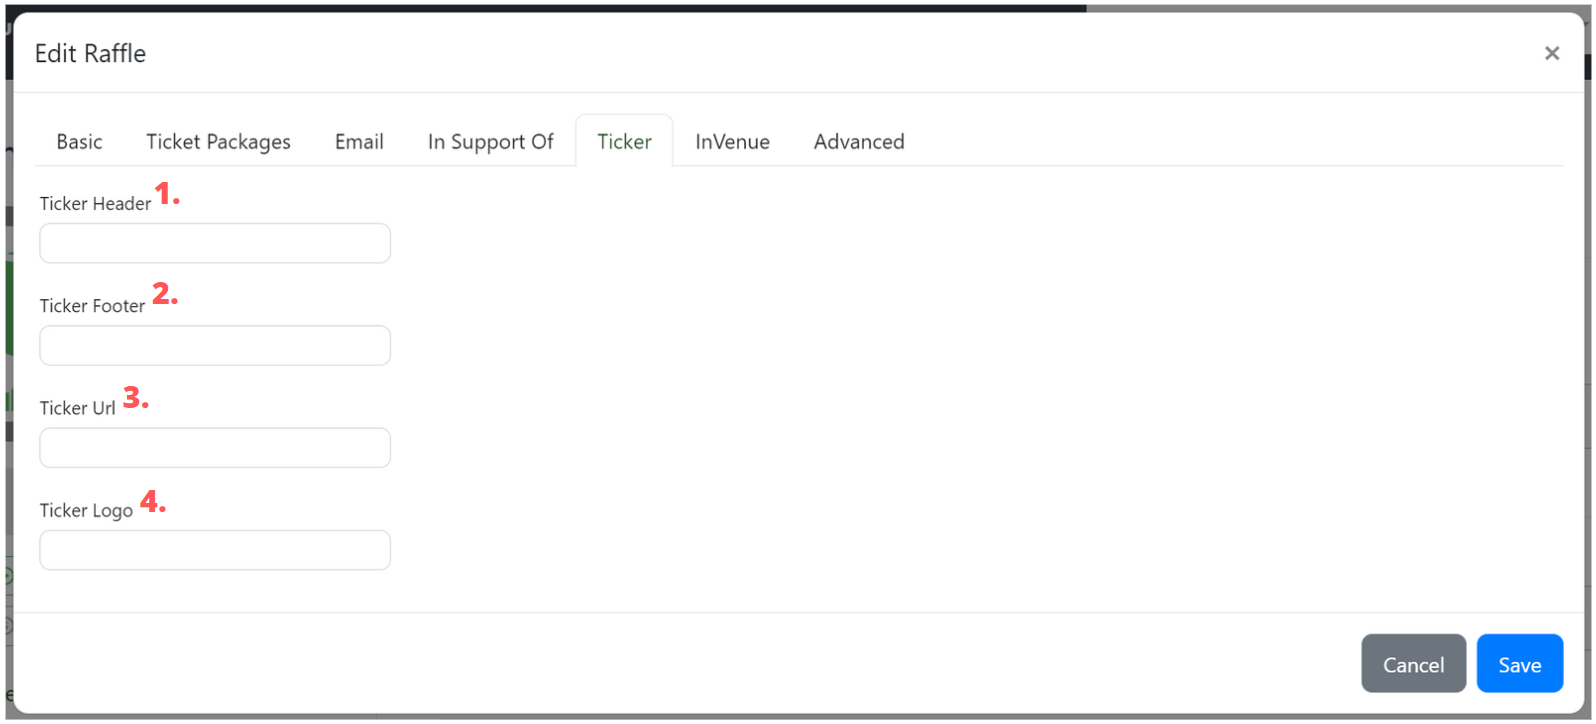
1. Ticket Header - Any text entered here will appear above the jackpot total amount seen on our TV ticker outlined in the article here
2. Ticket Footer - Any text entered here will appear below the jackpot total amount seen on our TV ticker outlined in the article here
3. Ticker URL - Deprecated Field
4. Ticker Logo - Enter the hosted image URL for your embedded ticker here. This image will appear above the jackpot value on the embedded iframe ticker outlined in the article here.
InVenue Tab:
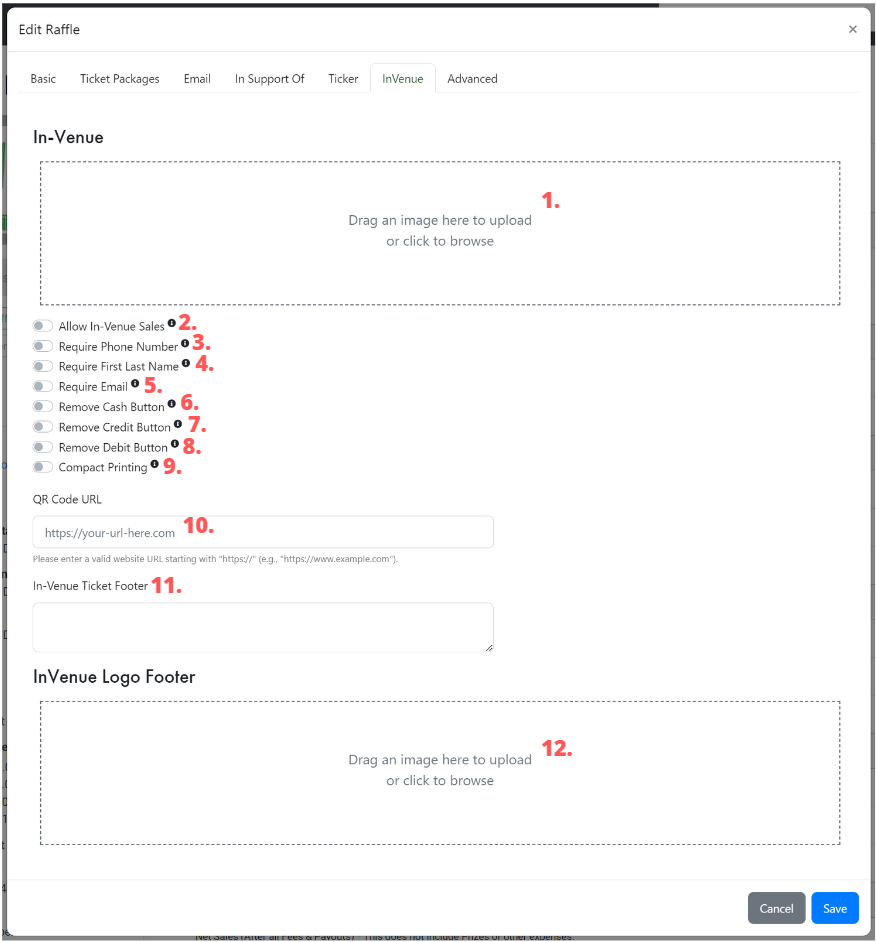
1. InVenue logo - The image uploaded here will appear at the top of the handheld terminal ticket print out. The image used should be a grey scale logo with a 1:1 ratio. We suggest 300px x 300px for print clarity.
2. Allow In-Venue Sales - When enabled this draw will appear on any Rafflebox POS terminal assigned to the raffles account. The draw will also need to be active and the start of sales time must be in the past.
3. Require Phone Number - Requires the phone number of the purchaser be recorded on the order before completing purchase on a Rafflebox POS.
4. Require First, Last Name - Requires the First and Last name of the purchaser be recorded on the order before completing purchase on a Rafflebox POS.
5. Require Email - Requires the email be recorded on the order before completing purchase on a Rafflebox POS. NOTE - The purchaser will also receive an email confirmation of their order identical to an online purchase if provided at time of purchase.
6. Remove Cash Button - Removes 'Cash' as an order type on the Rafflebox POS.
7. Remove Credit button - Removes 'Credit' as an order type on the Rafflebox POS.
8. Remove Debit button - Removes 'Debit' as an order type on the Rafflebox POS.
9. Compact Printing - Will list the range ticket numbers purchased rather than listing each individual number. Example - 3 tickets for $10 would be ticket numbers 1000-1002 instead of tickets 1000,1001 and 1002 on the printed ticket.
10. QR Code URL - **Currently Under Development** This will add a QR code to the handheld terminal ticket print out directing to the URL entered in this field.
11. InVenue Ticket Footer - Any text added here will appear at the bottom of the ticket receipt. This is typically used to enter additional provincial/state regulatory messaging like an age restriction.
12. InVenue Logo Footer - The image uploaded here will appear at the bottom of the handheld terminal ticket print out. The image used should be a grey scale logo with a 1:1 ratio. We suggest 300px x 300px for print clarity.
Advanced Tab:
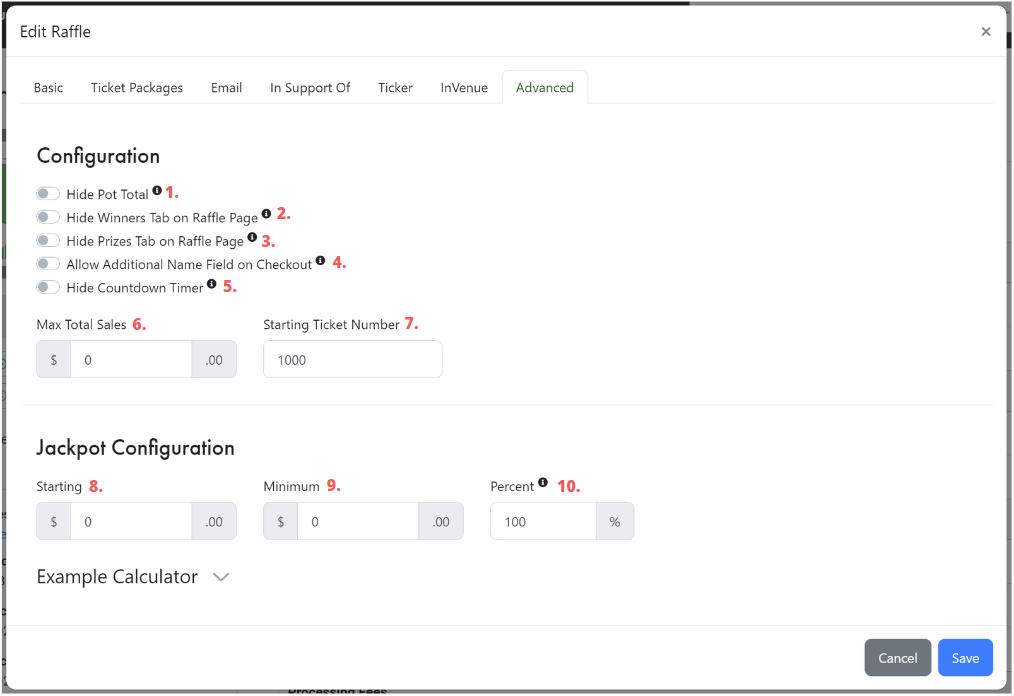
1. Hide Pot Total - This will disable the display of the total funds raised or jackpot tally on the raffle page.
2. Hide Winners Tab on Raffle Page - This will disable the display of the Winners and Prizes tab on the raffle page.
3. Hide Prizes Tab on Raffle Page - This will disable the display of the Winners and Prizes tab on the raffle page.
4. Allow Additional Name Field on Checkout - This will add an additional field to the billing page on the raffle checkout. This allows purchasers to add an additional name to their ticket purchase. Both the purchaser name and the additional name will be recorded and displayed on the purchase confirmation. NOTE - This may not be permitted in your raffle region.
5. Hide Countdown Timer - This will disable the display of the countdown to the close of sales on the raffle page.
6. Max Total Sales - This is the maximum sales value permitted on the raffle. In the event this value is hit the event will displayed a "Sold Out" message to purchasers.
7. Starting Ticket Number - All events issue tickets sequentially from this number forward. By default all draws start at ticket number 1000.
8. Starting Jackpot - This changes the jackpot value displayed on the raffle page. The value in this field will be displayed instead of $0 at the start of the raffle and all sales will tally up from here.
9. Minimum Jackpot - This changes the jackpot value displayed on the raffle page. The value in this field will be displayed instead of $0 at the start of the raffle. This value will be displayed until gross sales have passed this value. Example - a $1000 Minimum Jackpot is set and $500 has been sold the jackpot displayed remains $1000. If $1000 Minimum has been set and $1500 has been sold $1500 will be displayed.
10. Percent - By default this value is 100%. This will display the jackpot on the raffle page as this percentage of gross sales. Example - 90 is set as the Percent and $1000 have been sold the raffle page jackpot will display $900